


|
|
|

Click first under "Selected user" on the button "Create new" - anything else will help neither you nor us.
The following dialog boxes will appear activated for you to fill out:
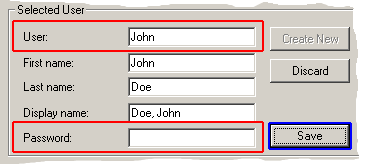 |
Important: You will need the entries from the fields:
"User" and "Password"
later for the client installation |
The password has nothing to do with the password for logon in Windows®, you can choose it freely.
You will need the user and the password later in the client installation.
The "Display name" will appear later in the window of the Public ShareFolder Administration program so that you can see which user has been set up and which accesses the Server Outlook®, that is who is "Online" at the moment.
Only the "User" field is a mandatory field. If you don't fill this out (or enter a user that has been used already), the "Save" button won't be activated.
All fields are independent of the Windows® logon. They don't need to agree with each other.
Please make a table like the example shown here in which you repeat exactly the entries for the User name and Password.
Please pay attention to upper and lower case capitalization.
| User | First name | Last name | Displayed | Name | Password |
Please test the installation first of all with a computer and a User!
Believe us it is astonishing how many users think that they of all people haven't made a mistake. Please do us and yourselves a favor and note down your user data.
After you have set up a user the following self-explanatory dialog box will appear:
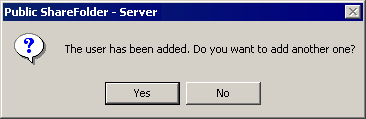
You can now enter further users or not, as you wish.
The Server now updates all entries fully automatically and adds the user.
Afterwards you can no longer change the entry: "User".
| Next |